A Christmas Craft

November 26, 2012

I love Christmas – I really do. But I also think that Thanksgiving deserves to be celebrated and not forgotten (thankfulness and all that, plus, hello –  stuffing and green bean casserole!!). So we had a wonderful and gluttonous Thanksgiving day that we were fortunate enough to celebrate with both sides of our family.

And just like that, the Christmas season began the next day. I don’t do Black Friday (way too lazy for that – Cyber Monday is more my style), but we had a great long weekend. A really great long weekend. I thoroughly enjoyed spending a lazy couple of days at home with my family. I even managed to find time to complete a Christmas craft and put up the first Christmas decoration of the season!

I’ve always put a wreath on our front door for Christmas, but since our front door is dark green, the standard green wreath gets lost and you can barely see it. I thought a red/silver wreath would stand out better so I saw this tutorial and pinned it. I deviated from the instructions a little as follows:

  1. I used a flat wreath form instead of a rounded styrofoam one because I was worried about how much space I had between the door and the storm door, but mine turned out very flat and I could have gotten away with using a rounded form.
  2. I probably used about 20 yards of ribbon instead of the 40 yards the instructions said. Mine was a little sparse, but I had run out of ribbon so I filled in as best I could by raiding my ribbon stash at home.
  3. Instead of using straight pins, I stapled some of the larger loops together and hot glued everything to the wreath form. Hot glue is HOT, just fyi, but I did make it through this project without burning myself which is more than I can say for my last (still unfinished) project involving hot glue!
  4. I embellished the wreath (aka filled in some spots) with some glitter-covered styrofoam balls.

I’m pretty happy with the way it came out. It’s definitely much more visible. It looked kind of stupid next to the pumpkins we still had on the front step, but those will be gone today and once I put up the other outside decorations, it should fit right in 🙂


The Kitchen Snowball: Complete.

November 14, 2012

The Kitchen Snowball, aka our living room/dining room/office project, took a bit longer than I had hoped. I think my expectations were a tad unrealistic. All we did was paint the walls and ceiling and put up a chair rail, but that required many steps. We painted the ceiling first, then the bottom part of the wall, then put up the chair rail, painted the top part of the wall, then painted the chair rail and base boards. Then we had to go back and do touch ups and paint the bulkhead/beam thingy that we were not able to reach with all our furniture pushed into the middle of the room.

AFTER Phase 2 – The Dining Room

That took about 1.5 weeks. But then, with no deadline hanging over our heads, things stalled out. It took awhile to put the room back together. But the good news is that it’s done now and we LOVE it!! It’s so refreshing to see new colors on the wall, especially a bold color like the one we chose for the bottom of the wall. Unlike our basement project, we didn’t have any help with the painting for this one (not that we didn’t get offers) so it was just Bill and I. And we managed to not kill each other and not end up on Renovation Realities (I know it was just a minor project, but still). I even used a nail gun without injuring anyone, so I call it a win.

The colors we chose were Brown Teepee for the top part of the wall and Spice for the bottom part, both by Behr.

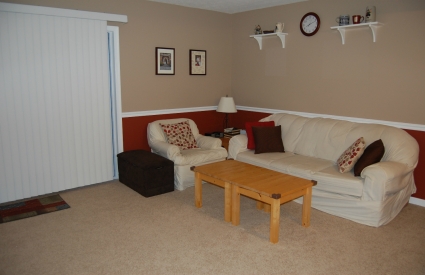
AFTER Phase 2 – The Living Room

A major plus to this whole project (kitchen included) is that we ended up packing up a TON of stuff to give away. Lots of kitchen stuff, books, decorative items, and clothes (clothes have nothing to do with this project, but I figured it was a good time to purge). We removed 2 out of the 3 bookshelves we had in the office and dining room which required some shuffling, but it looks a lot less cluttered in there now. And we finally got a chance to hang our diplomas up on the wall! We worked hard for them, they really deserve to be on display!

AFTER Phase 2 – The Office

October was a rough month with our house turned upside down. We are grateful to our parents who were on babysitting duty pretty much every weekend. I know they (and Caelan!) had a lot of fun. But I am happy to not have to pack him up and ship him off every weekend anymore. (If only he’d start napping again!!) Overall, this whole project (the kitchen included) took about 6 weeks, including putting-back-together time, and we made it by my Thanksgiving deadline 🙂 Now I am happy to enjoy our new space and get ready for the holidays!

AFTER Phase 2 – The Whole Room