The HOUSE Project: Finished

October 3, 2014

I did a horrible job following our house building project on the blog. I posted pictures occasionally on Facebook, but I never felt like I had enough to SAY about it to warrant a blog post.

But now…IT’S FINISHED. And we started moving in less than 24 hours after it was officially ours. To say “we couldn’t wait” would be a ridiculous understatement. We’ve been living there for 3 weeks now and somehow it feels both surreal AND like this house has always been ours. Because, really, it HAS always been ours. It doesn’t feel like we moved into someone else’s home because it never did belong to anyone else.

Selling our townhouse and living in temporary housing was not fun at all, but putting that aside, watching our house being built was amazing. We drove by to visit probably 2-3 times a week during the 4 month build time to check on the progress. Anytime a friend or neighbor drove by and then texted us to tell us the drywall truck had arrived or the siding was going up, we squeeeed and loaded the kids into the car to drive by for a visit. (Okay so it may have just been me doing the actual squeeeeeing, but Bill was excited too 😉 )

lot

Our empty lot – March 2014

Our house - September 2014

Our house – September 2014

It’s very surreal to remember standing in our house when it was just plywood – no walls, even – and then now standing on the same spot and seeing…a kitchen…a hallway…

Looking into the kitchen - June 2014

Looking into the kitchen – June 2014

20140909_151829

Looking into the kitchen – September 2014

Since we’ve moved in, we’ve been working hard at unpacking. It is likely to take forever and ever. “You have time!” everyone says. And we do, but…we’ve been living in chaos for the past 6 months -first in our super sterile house on the market and then in our box-filled apartment. We’ve been waiting and waiting and counting the days and seconds until we could move into our new house and FINALLY unpack and feel at home again.

So that’s what we’re doing. We’re getting window treatments for our 24 (omggggg) windows. I got a Welcome mat, shelves, storage units, fabric drawers (you can never have too many 😉 ), and other such random organizational crap. The UPS guy learned where our house is REAL quick. No doubt we will be BFFs by Christmas (or he’ll hate me, we’ll see).

20141002_173628

Welcome

People keep mentioning painting and decorating to me and yes, I can’t wait to decorate. And yes, despite good advice from a friend to stay away, I’ve been on Pinterest. But really, for now, I am happy to stash any box that says “decor” on it in the basement for the time being and just get things put away first, decorate later. Except for my Fall wreath – gotta have that 🙂

We are slowly learning how to care for a lawn bigger than a postage stamp…assuming of course that we will even have a lawn! Our grass has struggled during the mostly dry September, but it is starting to come up now. While I squeee over mud room benches, Bill can’t wait for the tractor (riding mower) to be delivered.

Finally some green

Finally some green

When it comes to what I love most about the house, there are a lot of things to choose from! The kitchen, of course. I’m so pleased with how it all came out. It’s hard to choose cabinets and counter tops with swatches but I like the choices we made. I really love the space though. In our townhouse, if all 4 of us were sitting at the dinner table, we couldn’t open the refrigerator door – that’s how cramped it was. Granted, we sort of tried to force that kitchen to be an eat-in kitchen when it really wasn’t, but still. Now we have the morning room and it is perfect. I browse online for a new kitchen table and chairs almost daily. That’s definitely at the top of my wish list but we will probably hold off for awhile.

Morning room

Morning room

A new kitchen table is just one thing on a very, very long wish list we have for this house! But in this case “You have time!” really does apply. We have time for projects and organizing, finishing our basement, adding a patio/deck, etc etc etc. But for now, we are happy to just be HOME.


The HOUSE Project: The longest month…

July 1, 2014

It’s only been about a month since we settled on our town house and it officially became our “old house” (Caelan calls it the “empty house” or the “dirty house”, not sure why). We’ve been settling into our apartment and things are going well. The kids are sharing a room and there is plenty of space for both of them. We did run into a pretty significant sleep regression with Leah and as much as we didn’t want to have to do this in the apartment, we had to do a sleep training refresher. Thankfully, she’s back on track…sort of…some days. Sorry neighbors :/

In the past month, we’ve been unusually busy with moving and unpacking, birthday parties, new babies, and family time. Usually when you’re really busy, time flies by and we’d sure love that since all we’re doing right now is waiting for our house to be built. But somehow, the past few weeks have draaaaaaaaaaaaaagggged on forever! It’s only been a month?! Really?! And we still have 2-3 more months to go 😦

They ARE making significant progress on our house though. Here is what it looked like at the end of May…

May30

Day #17

The framing happened fast. It took about 3 weeks. I took the picture below after they had already moved on to the mechanical work inside.

Day #46

Day #46

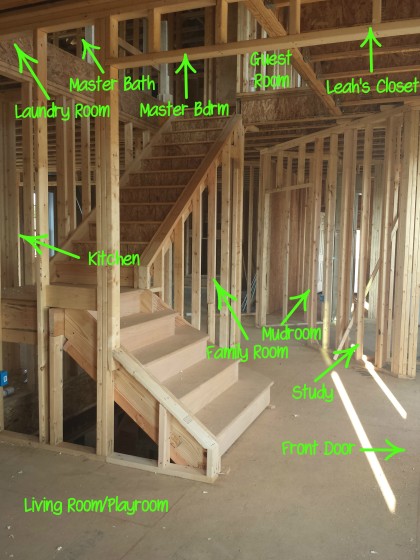
And speaking of inside…It’s hard to take a meaningful picture because unless you’re familiar with the floor plan, it really just looks like a lot of 2×4’s everywhere. But this picture actually includes quite a few of the rooms in the house.

A view of the inside

At this point, they are working on “boring” but important things like installing duct work, plumbing and electrical. We’ve already made super important decisions like which light switches control which outlets and where the recessed lights in the kitchen will go (“Here-ish,” I said, drawing an imaginary line in the kitchen with my finger. The builder did not hesitate to tease me about my precision 🙂 )

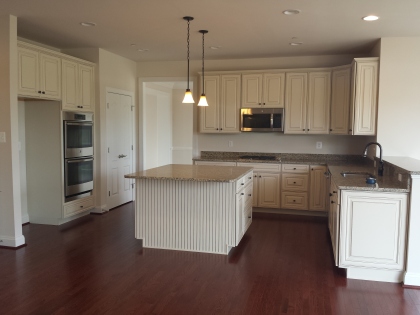
We were more precise with our decisions on the kitchen cabinets which have also been finalized and ordered!

Kitchen

Kitchen

In the next month, they should be finishing up the mechanical work, putting up drywall, and installing the kitchen. We will really be getting close by then. Here’s hoping July moves along at a reasonable pace!


Rocket Clock Mini-Makeover

November 1, 2011

When Caelan first starting sleeping in his crib at night, I’d nurse him while sitting in the rocking chair in his room. I’d always look up at this one spot on the wall expecting to see a clock there, but there wasn’t one, nor had there ever been a clock in that particular spot.

I looked around online for a clock that would fit into our theme in that room. I was specifically looking for something with a rocket ship on it because though the bedding set we picked out for Caelan had rocket ships on it, we didn’t really incorporate those into the room and I wanted to. I found this clock at Cafe Press. I really liked it because the dark blue background would be a good match to the dark blue wall and of course I liked the rocket ship. I didn’t like the black outer rim, but I thought maybe I could paint it white.

What I didn’t realize until I hung the clock on the wall was that the black hands on the dark blue background made it impossible to read unless you were standing within 2 feet, which sort of defeats the purpose of a wall clock. So now I started to think that in addition to painting the rim, I should also paint the hands. I knew the clock must come apart so I carefully tried to remove the clear face and the hands and luckily it worked out.

I used white acrylic paint and a foam brush and painted the rim and hands with about 5-6 coats. I also went over the hands with about 5 coats of glow-in-the-dark paint that we had left over from painting the stars and moon on the walls. The hands did seem to glow once the paint had dried, but once I reassembled the clock, the hands don’t really glow anymore. Possibly the clear cover over the top interferes with the charging?

Regardless of the glow-in-the-dark issue, this project worked out and now the clock is much easier to see!


Our Living Room Lay Abandoned…

September 8, 2011

Before we had the basement (and the baby) we spent our evenings and weekends in our living room. It’s where our big TV was, where our game consoles were, and where my computer was. We’d come home from work, eat dinner, and then hang out in the living room watching TV, being on the computer, paying bills, folding laundry, etc until it was time for bed. At the risk of sounding super cheesy – it was the heart of our home.

Now that room is a wasteland. Half of the furniture, including the TV, has been moved out of there. Displaced office furniture and office supplies take up one corner of the room. The now spacious floor is littered with dropped bibs or burp cloths, a changing pad, bags of baby clothes and supplies not yet in use, empty diaper boxes, a car seat, and a printer (yep one of the ol’ fax/scanner/copier ones). This room that was once the center of our home was abandoned 3 months ago, immediately after we brought the baby home. We spend approximately zero time there now.

The plan for this room was for it to become half office, half formal living room. And by “formal” I mean there wouldn’t be a TV in there, there won’t actually be anything “formal” about it. Because we got the basement finished in just the nick of time and our priority was to get that new family room usable, the living room lay abandoned. Unfortunately, it’s the first room you see when you come into our house, so the fact that it’s in such disarray is embarrassing. And it’s increasingly annoying for both Bill and myself. It would really be nice to get it together. And it would be nice to get the office side of the room operational too so that when I need to print something I don’t have to plug my laptop into the printer on the floor.

I’d include a picture, but it’s just too sad. I think I’ll take one and share it later, as a “before” picture once the room is presentable.

I am going to be hosting a party in this room 2 months from now so that’s how long I have to whip it into shape! I like working on a deadline – it’s very motivational. My pregnancy due date definitely kicked our basement project into high gear, but since I don’t plan to have another baby in the next 2 months, this party will have to do for motivation! Now if only I had some free time…


Nightstands: The Conclusion

August 3, 2011


If you’re not familiar with my ridiculous mission/obsession with nightstands you can catch up with these two posts here and here. If you don’t care about my mission, I don’t blame you, but you might want to skip this post in that case 🙂

It’s been about 3+ years since we bought our bed and we now finally have 2 matching nightstands to go with it. As Bill said “we have real matching furniture now…like adults”. And it’s true that this is pretty much the only room in the house where we have new furniture that matches.

You’ll remember from my last post that Bill bought me 2 unfinished nightstands for my birthday earlier this year. Once we picked them up, we went to Home Depot in search of a stain that would match our bed. We picked out 2 jars of stain and Bill took the stands to his parents’ garage to test out the stains with his dad’s help.

Somehow, Bill’s dad ended up adopting this project and made it his mission to match the color perfectly. He tested each of the samples we had purchased and of course neither of them were even close just because the stain looks so different depending on what kind of wood you’re staining.  So over the course of a couple months, Bill’s dad tried out various stain samples and even mixed different colors together to try to find the perfect match. He finally gave us 2 to choose from and we picked one that we thought was pretty damn close to the bed color. But even then, Bill’s dad wasn’t totally convinced. He mixed up yet another color, stained both stands, and added a coat of polyurethane.

They look FANTASTIC. They seriously match the bed exactly. I took several pictures in an attempt to accurately represent what the colors look like and this one is the best I got. The stands came with wooden knobs, but I think one of them got lost in the shuffle, so I picked up 2 knobs at Home Depot in a “Venetian Bronze” finish that matches our lamps. They look great and I am SO happy with them!!

A million thanks to my father-in-law for taking on this project for us 🙂

**I wrote this post back in May but then I got sidetracked by the small matter of having a baby and so I’m just getting around to posting this now 🙂


An early Birthday Gift from my sneaky husband

January 28, 2011

One afternoon earlier this week, Bill and I had an appointment to visit a daycare center. Since we were both off early from work, he asked if I’d like to go pick out my birthday gift after the appointment. Of course he wouldn’t tell me what it was or where we were going, but that’s how he rolls – he likes to be cute and sneaky 🙂

So we drive out to Finksburg which is about 10 miles north of where we live and we pull up to some random little store on the side of the highway. (Not sure if Rt 140 is considered a highway, but it’s farm country up there, so it’s about as highway as it gets!) Still having no clue what we’re doing, I see the sign that says Bare Wood House: Fine Unfinished Furniture.  Eek!! We’re here for nightstands!! Trying to hide my smile, I lie when Bill asks me if I know why we’re here. “Maybe”, I say. Just in case he brought me here for some other type of furniture (which I also would have loved).

If you’re not sure why I’d be so excited over nightstands, check out my previous post describing my years long battle to obtain nightstands that match our bed and don’t cost a fortune.

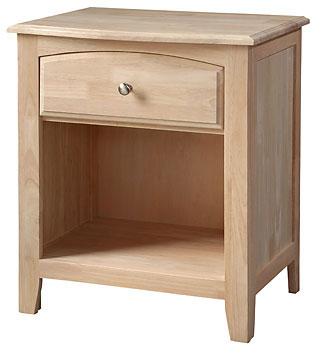
Anyway, we were indeed there for nightstands. It turns out that his original plan was to get the stands, stain them and set them up in our room to surprise me on my birthday. While that would have been awesome, it didn’t turn out to be feasible since he’s been so busy working on the basement this past month and hasn’t had much time. So what he did was reserve 2 nightstands for me (last weekend), but wasn’t sure if I’d like them and he wasn’t sure about them himself. So we ended up picking out another style and placing an order for 2 of these:

It’s a nice, plain, basic nightstand that had a drawer and an enclosed shelf, which is what I was looking for. And buying them unfinished solves the problem of trying to match the stain to the stain on our bed. I mean, we still have to buy a jar of stain in the right color and stain these things, but this way we are not limited to searching for something already stained.

When I add up the cost of these nightstands, plus the stain and materials we’ll need to stain them, we will be saving $450+ over buying the ones that “officially” match our bed. Definite score, and THANK YOU to my husband for the great gift! I will update once we have them stained and set up!


The Nightstand Scam

August 19, 2010

August 2010

Bill and I bought our current Queen sized bed about 2.5 years ago. We went to tons of furniture stores, but couldn’t find what we were looking for. We finally found a bed we liked from an online vendor for a steal of a price (I want to say it was around $300). The ordeal of actually getting the bed and all of the pieces to our house took about a month and we did have to get the BBB involved, so it was not easy. But we lucked out because we do really like our bed. And though they aren’t pictured here, the bed has 4 large drawers on the bottom for extra storage.

[photo credit]

Now that we are happy with our bed, I would like to have a set of nightstands to go with it – one for each of us. Below is the nightstand that matches our bed. I’m not a huge fan of it really – the lines are a little…dainty? I don’t feel like it’s a good match for the bed.

[photo credit]

Here’s where the “scam” comes in. Nightstands are outrageously expensive. They jack up the price on these things because they can. If you want a matching set, you have to pay out the a** for it. This matching nightstand costs $370. And we need two, so that would be $740, plus shipping because this is online, so easily $800 for nightstands. We only paid $300 for the whole bed!

I refuse to fall victim to this scam, so I have been on the hunt for nightstands to go with our bed for about the past 2 years. I figured that our bed was plain enough that I could find something that would “go” with the bed, even if it wasn’t technically part of the same set. And ideally, I wanted to spend less than $150 per stand. I knew that matching the stain would be the hardest part, especially if I bought online. I looked around in many actual stores at nightstands, end tables, printer carts, and telephone tables and I didn’t find anything that A) matched, and B) was in my price range. I would prefer real wood for these, but I was willing to go with veneer as long as it looked nice.

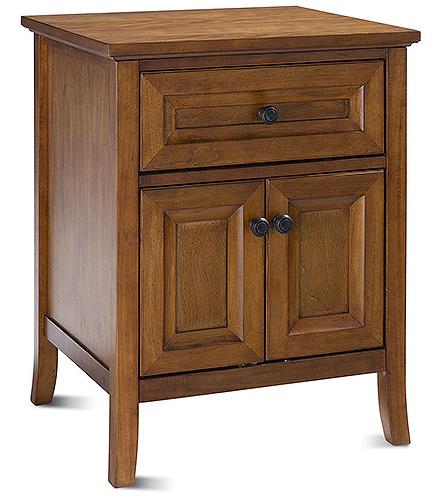
Enter Target. I found the below pictured Dolce Nightstand online at Target for $119.99 – with free shipping. Score!! Free shipping and if it didn’t match I could just return it to the store and not have to eat any costs. Now even though the color in this picture doesn’t look like it matches the picture of the bed, it actually was a very close match to what the bed looks like in reality.

[photo credit]

Unfortunately, the nightstand arrived, and though it was beautiful (real wood) it was much darker than the picture and did not match the bed at all. I knew this was a possibility because it is very hard to match colors online, but I took a chance and it didn’t work out. And I was bitterly disappointed – I really LOVED this one. I thought it was a perfect match in style to our bed. Even looking at it again makes me sad/angry!

More than 6 months later, I found this one online from Walmart for $109 for a pair of them, and again free shipping. I know what you’re thinking – these don’t look like they’ll match at all!! Well when I held this picture up to the wood on our bed, it looked pretty close, so I took a chance.

[photo credit]

They arrived yesterday and when I finally opened the box and took a piece of it up to the bedroom to see if it matched…it didn’t. It was closer than the one from Target, and annoyingly the underside of the pieces matched well, not not the polished fronts. I angrily stuffed the pieces back in the box and exclaimed (inwardly) that I give up!! I will never find nightstands and I will never buy one online again hoping it matches.

And yet this morning I was online searching again. Will I never learn? I may or may not find something else I want to take a risk on, but it may end up coming down to this:

[photo credit]

Or this:

[photo credit]

At this point, building them myself would be kind of ideal. I’d get exactly what I want, I could stain it to the exact color, and it would be immensely cheaper than anything else. If only I had excellent building skills.